Introduction
VMware ESXi stands out as a premier type-1 hypervisor, designed to facilitate virtualization by permitting numerous virtual machines to operate on a single physical host. Being a bare-metal hypervisor, it has the unique capability to function directly atop the server hardware without dependency on any underlying operating system. This results in heightened efficiency and adaptability in the orchestration and deployment of virtual machines. Given its robustness, security, and scalability, VMware ESXi is a favored option in corporate and data center landscapes.
The convenience and expandability offered by ESXi have garnered the interest of numerous IT specialists and engineers. They found it seamless to generate virtual machines, each with distinct operating systems, apps, and setups, and supervise them through a unified central dashboard. This simplified framework eliminated the hurdles and expenditures associated with handling physical servers.
Beyond its basic offerings, ESXi boasts a range of advanced functionalities catering to businesses across the spectrum. Among its notable features are its formidable security mechanisms designed to shield virtual machines from malware, unwarranted intrusions, and other potential hazards. Furthermore, its inherent high availability and disaster recovery systems ensure uninterrupted accessibility of virtual machines, even amidst hardware setbacks.
As years passed, VMware persistently refined and enriched ESXi, integrating innovative features that elevated its potency and dependability. This continual evolution solidified its position as the preferred choice for diverse entities, spanning major corporations, governmental bodies, and burgeoning businesses.
Hardware Specifications
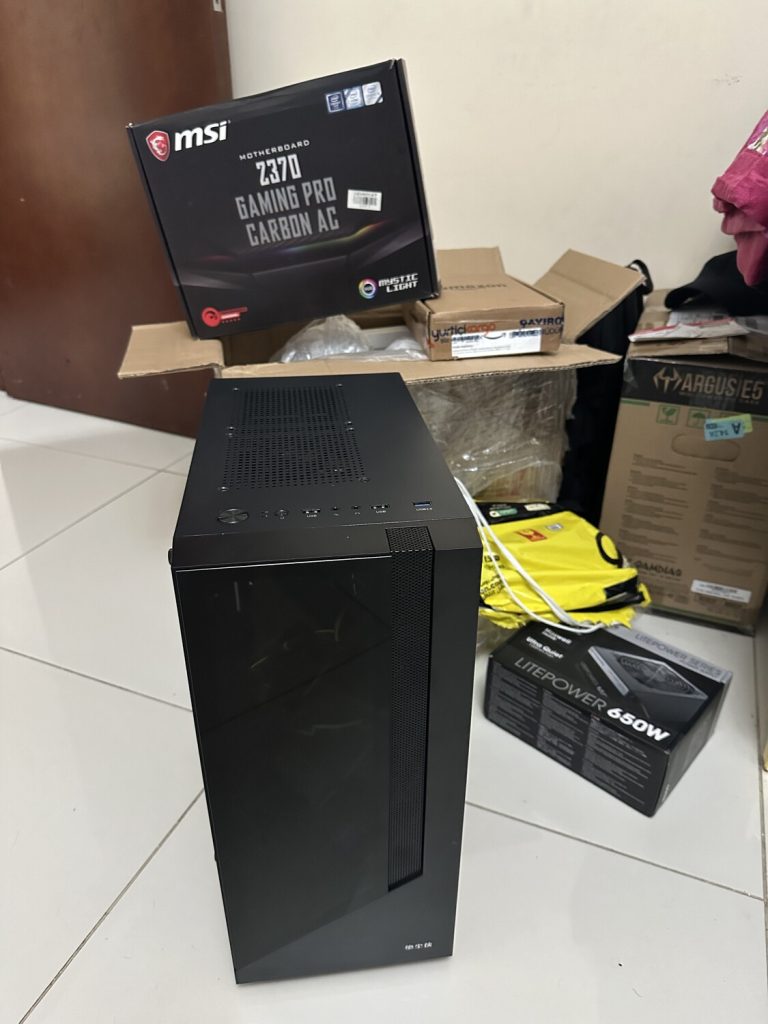
In my recent endeavors, I repurposed an older workstation I had on hand. Below are its technical specifications:
- CPU: Intel Core i7 (8th Generation)
- RAM: 64GB DDR4
- Graphics Card: NVIDIA RTX 1080 GT with 12GB VRAM
- Storage: Data: 2TB HDDESXi | Boot: 512GB eNVM | ISO Files: 256GB SSD
- Network Interface Card (NIC): 10 Gbps Ethernet + Wireless card.
on the other hand, the minimum requirements to build, or upgrade the ESXi server are:
ESXi 7.0 System Requirements:
- CPU: Minimum of two cores.Must be a 64-bit x86 multi-core processor. For specific supported processors, refer to the VMware compatibility guide.NX/XD bit must be enabled in the BIOS. Support for hardware virtualization (Intel VT-x or AMD RVI) is required for 64-bit VMs.
- RAM: Minimum of 8GB for typical production environments with VMs.
- Network: At least one Gigabit (or faster) Ethernet controller. Refer to VMware’s compatibility guide for specific adapter models.
- Storage: Boot disk requires a minimum of 32GB (HDD, SSD, or NVMe). USB, SD, and other non-USB flash media should be used exclusively for ESXi boot bank partitions. Boot devices must be exclusive to individual ESXi hosts. For VM storage, use SCSI disks, local non-network RAID LUNs with unpartitioned space, or SATA disks via supported controllers. Note: By default, SATA disks are seen as remote and aren’t used for scratch partitions.
ESXi 7.0 Booting Requirements:
- vSphere 7.0 allows ESXi host booting via the Unified Extensible Firmware Interface (UEFI).
- With UEFI, systems can boot from hard drives, CD-ROMs, or USB media.
- vSphere Auto Deploy facilitates ESXi host network booting and provisioning using UEFI.
- ESXi is capable of booting from disks over 2TB, provided the system’s firmware and any add-in card firmware support it. Consult vendor documentation for specifics.
Storage Requirements for ESXi 7.0 Installation or Upgrade:
- Basic Requirements: For optimal performance, use a persistent storage device of at least 32 GB for booting. An upgrade to ESXi 7.0 demands a minimum boot device size of 8 GB. When booting from a local disk, SAN, or iSCSI LUN, a 32 GB disk is essential to accommodate system storage volumes. These volumes encompass a boot partition, boot banks, and a VMFS-L-based ESX-OSData volume, which functions as the legacy /scratch partition, a locker for VMware Tools, and a core dump destination.
- Optimal Storage Options: A local disk of 128 GB or more ensures comprehensive support for ESX-OSData, which includes the boot partition, ESX-OSData volume, and a VMFS datastore. Devices should support a minimum of 128 terabytes written (TBW). Devices should provide a minimum sequential write speed of 100 MB/s.For added reliability, consider using a RAID 1 mirrored device.
- SD & USB Device Limitations: SD and USB devices are suitable for boot bank partitions. For optimal performance, it’s also advisable to equip a separate local persistent device of at least 32 GB for the /scratch and VMware Tools sections of the ESX-OSData volume. The ideal size for such persistent local devices is 128 GB. Storing ESX-OSData partitions on SD and USB devices is being phased out. Notably, from ESXi 7.0 Update 3 onwards, if the boot medium is an SD card or USB with no accompanying persistent local storage (e.g., HDD, SSD, or NVMe), the VMware Tools partition is automatically generated on the RAM disk.
For more information, read VMWare ESXi documentation.
ESXi Installation
Hardware Prerequisites:
Before initiating the installation, ensure you have the following:
- An external monitor to interface with the ESXi server.
- A standard keyboard.
- A minimum 4GB flash drive.
Essential Software Tools:
To prepare a bootable flash drive, the following software options are recommended:
- For Windows: Rufus Download Rufus
- For Mac OS & Linux: BalenaEtcher Download BalenaEtcher
Finally, you’ll need the VMWare ESXi 7.0 ISO file. You can obtain a complimentary copy from the link below:
https://customerconnect.vmware.com/evalcenter?p=free-esxi7
Installation Steps:
1- Insert the VMware ESXi 7 installation disk and start the Computer. Then, VMware ESXi 7 Installer starts and reads files from the disk.
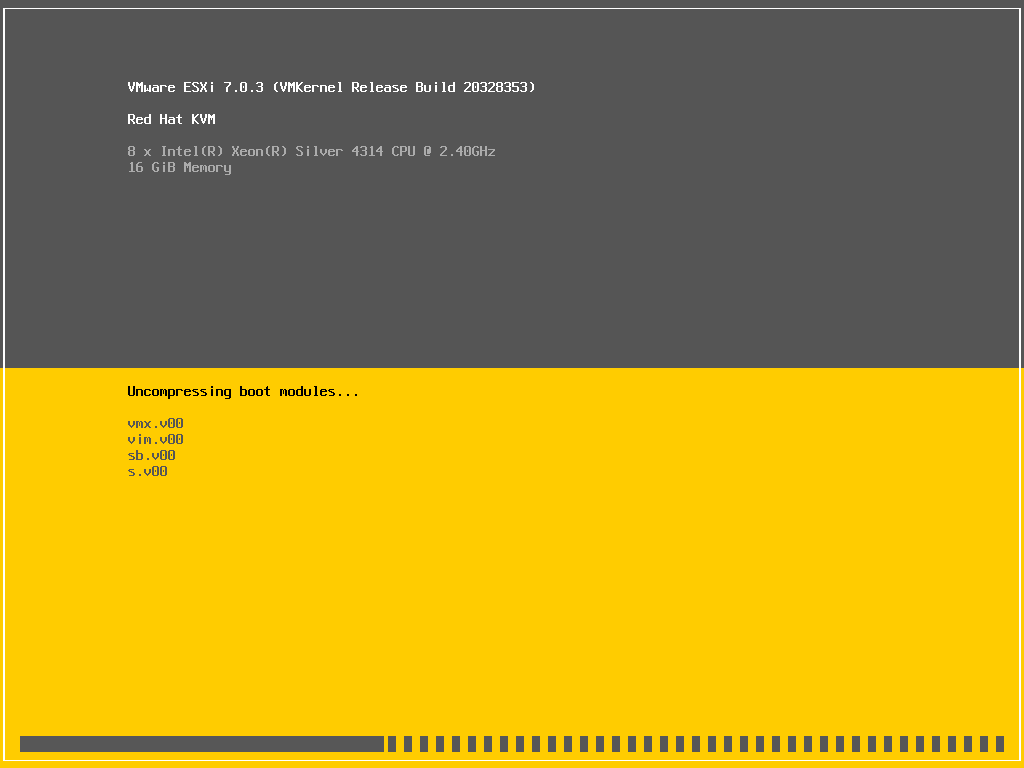
2- Push the [Enter] key to proceed to the next.
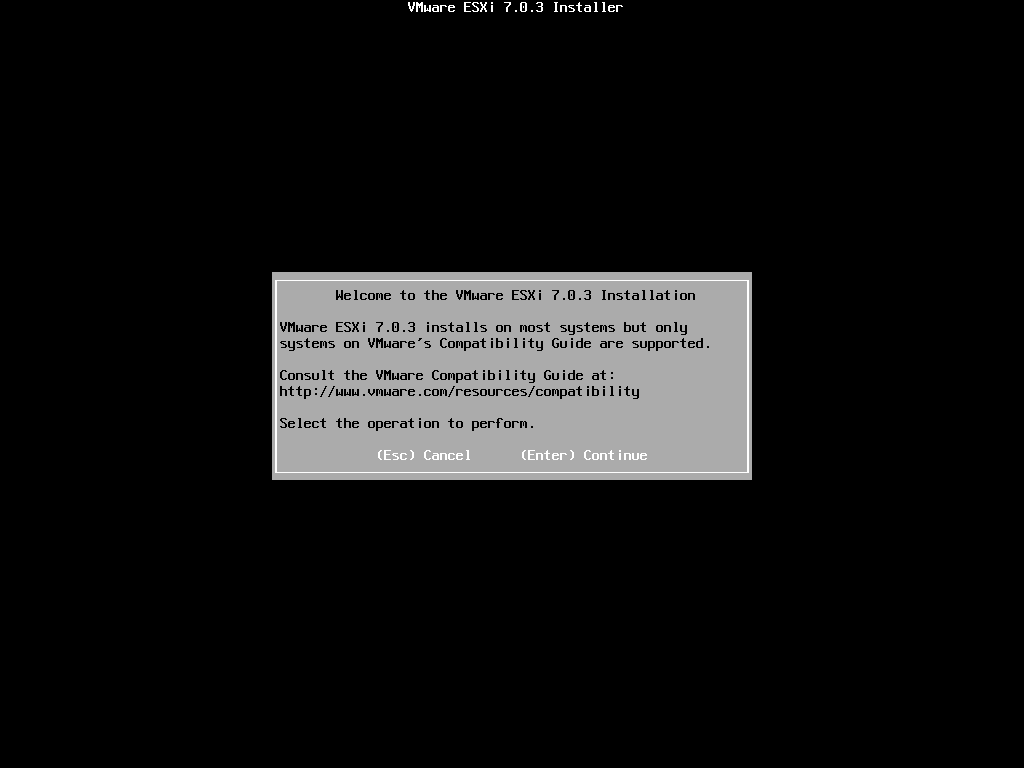
3- Push the [F11] key to accept the license agreement.
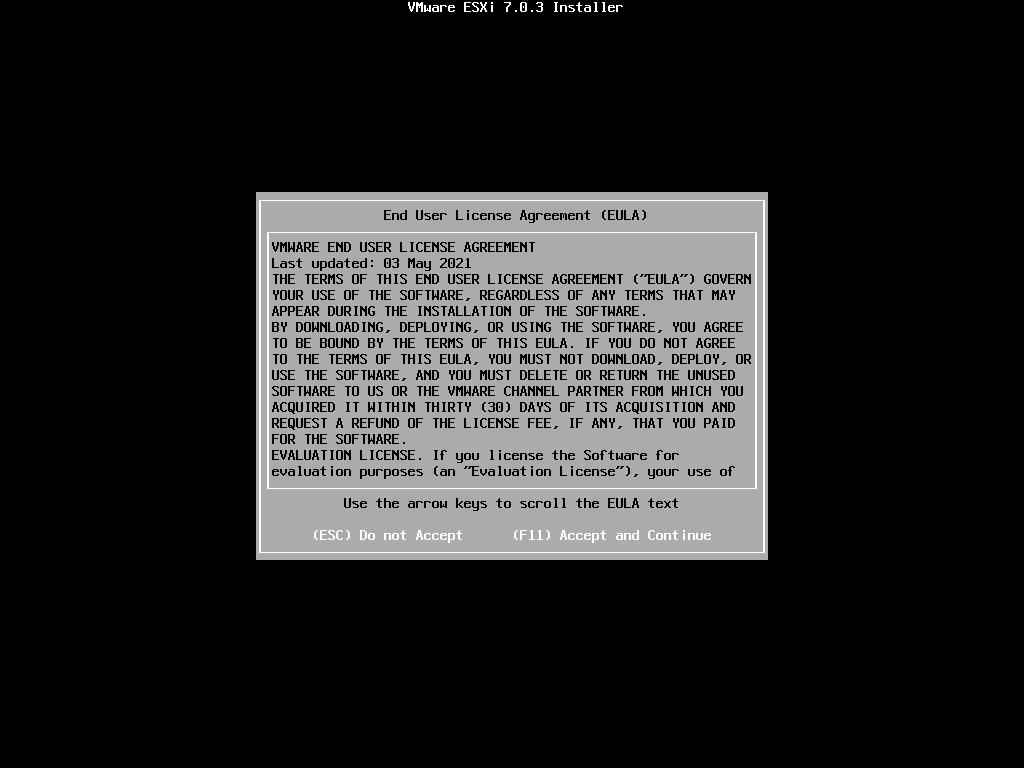
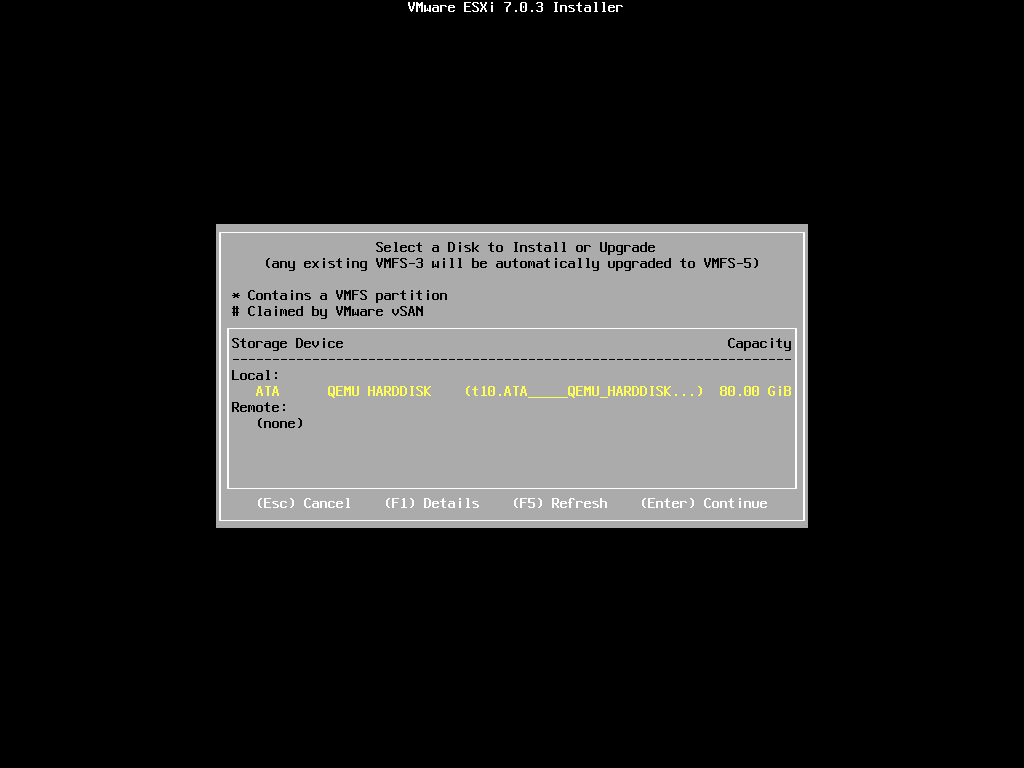
4- Select a disk you like to install VMware ESXi 7 and Push the [Enter] key to proceed to the next.
5- Select a keyboard layout you are using and Push the [Enter] key to proceed to the next.
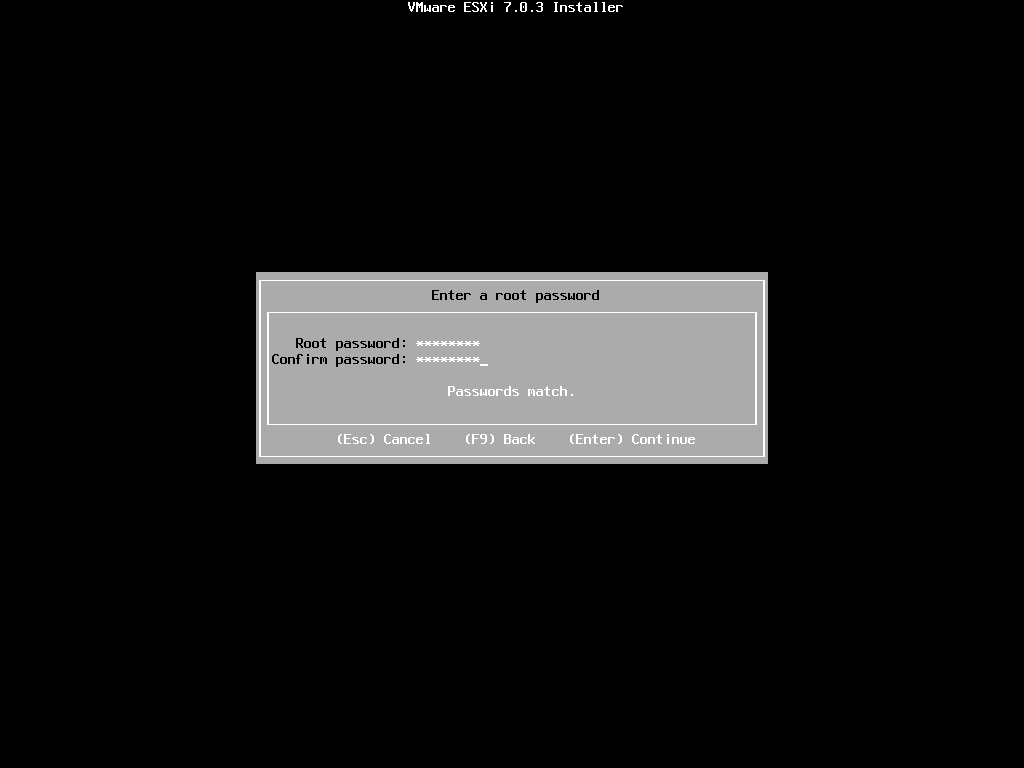
6- Set the password for the root user account and Push the [Enter] key to proceed to the next.
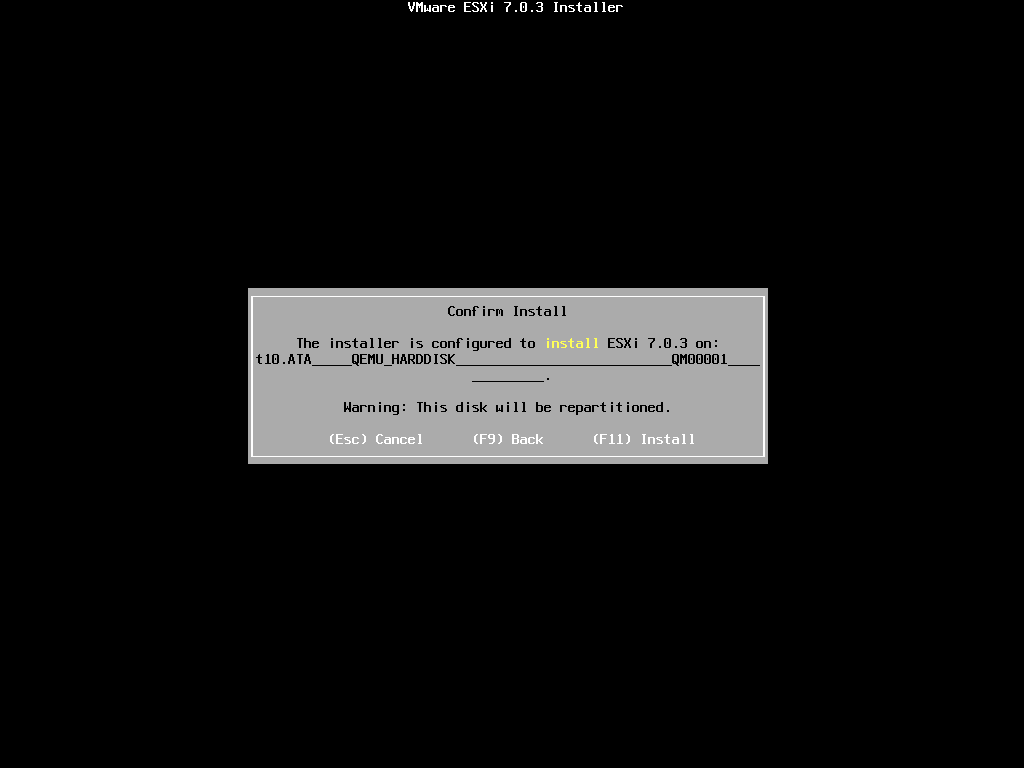
7- Confirm selections and Push the [F11] key to begin the installation.
8- After finishing the installation, Push the [Enter] key to restart the computer.
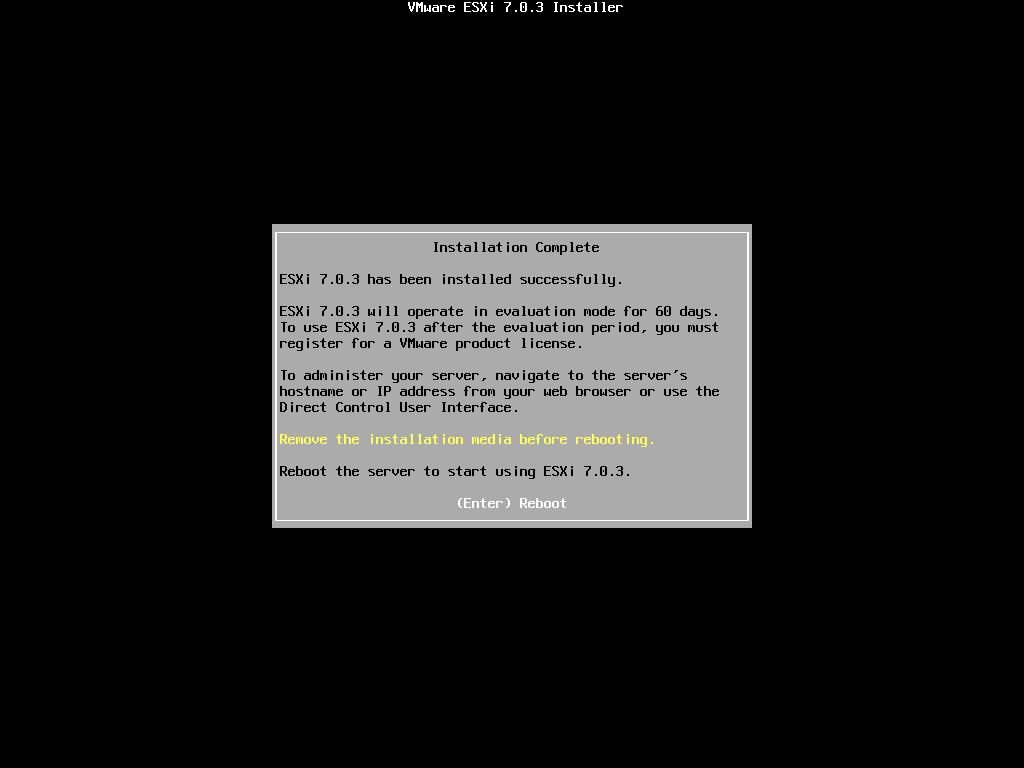
9- After restarting the computer, the VMware ESXi 7 default console window is shown. Verify installation to log in with the root user account. Push [F2] key.
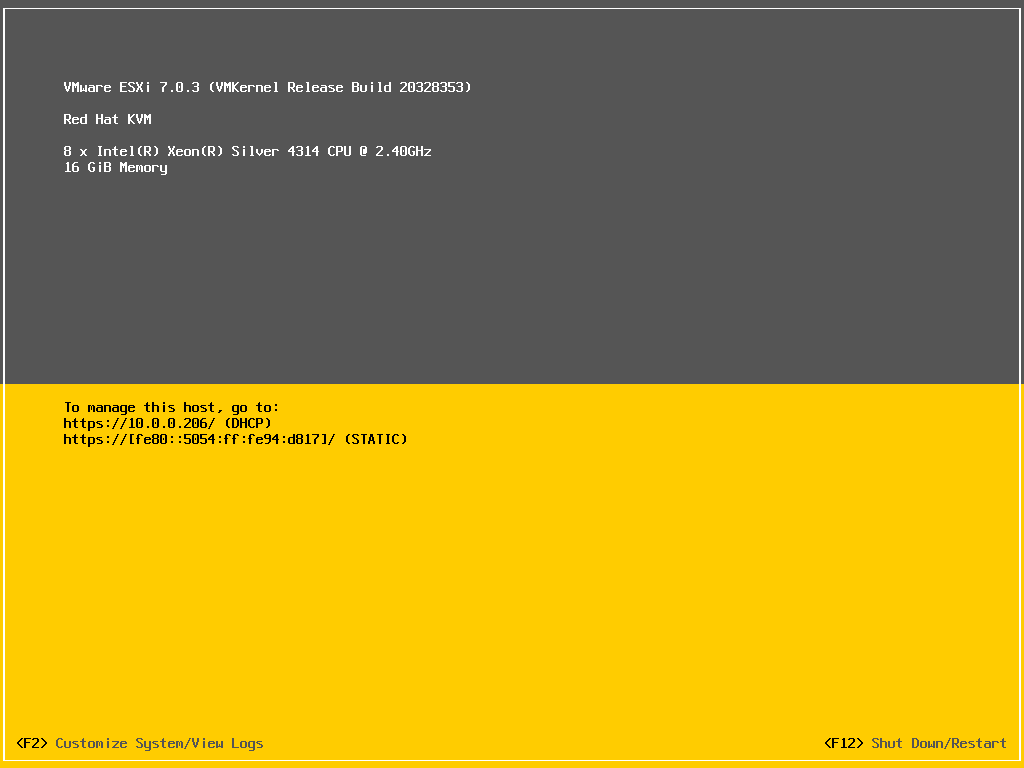
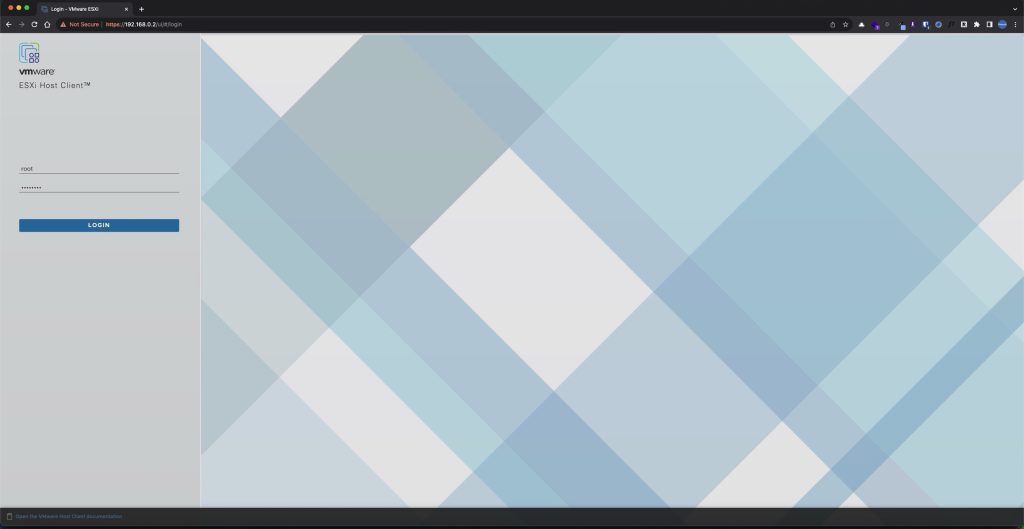
To manage your ESXi, access its web interface:
1. Launch your internet browser.
2. Enter the IP address you previously designated during the installation process.
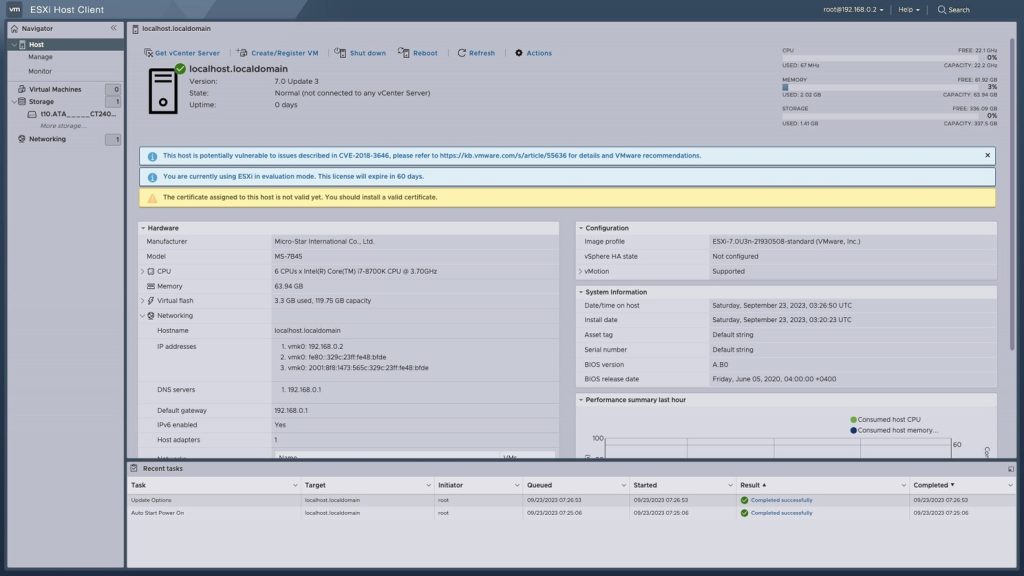
Once entered, you’ll be directed to the ESXi management console where you can log in and start managing your server.
Activating ESXi 7.0
VMWare offers a complimentary version of ESXi 7.0. While it comes with certain restrictions, like the number of CPU cores you can allocate to a VM, it’s still quite suitable for home labs or personal use. VMWare makes licensing for this version available on their website.
To download the ESXi ISO file and procure your personal license, you’ll first need a customer account. Creating one is straightforward — simply head to the VMWare website and follow the registration prompts.
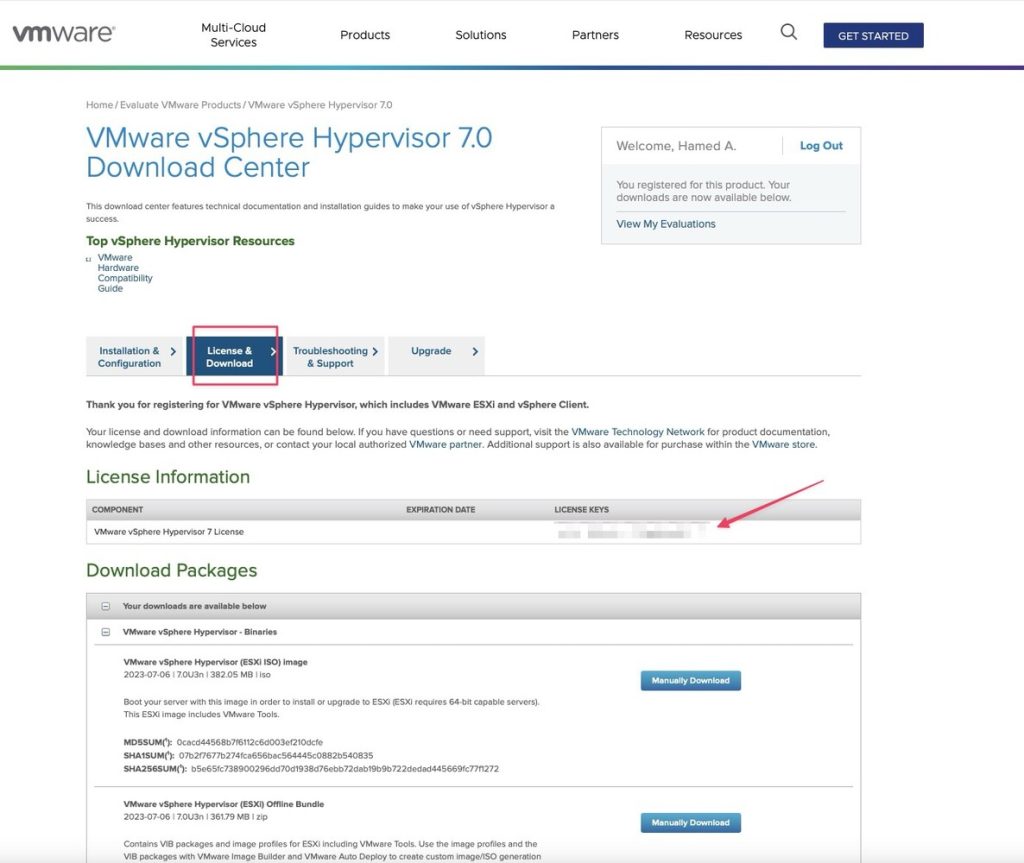
To obtain your personal license for ESXi 7.0:
- Navigate to VMWare’s Evaluation Center.
- Log in using your account credentials.
- Choose “Licenses & Download.”
- Click on the “Generate” button to receive your license key.
Ensure you store the key safely, as you’ll need it to activate your ESXi installation.
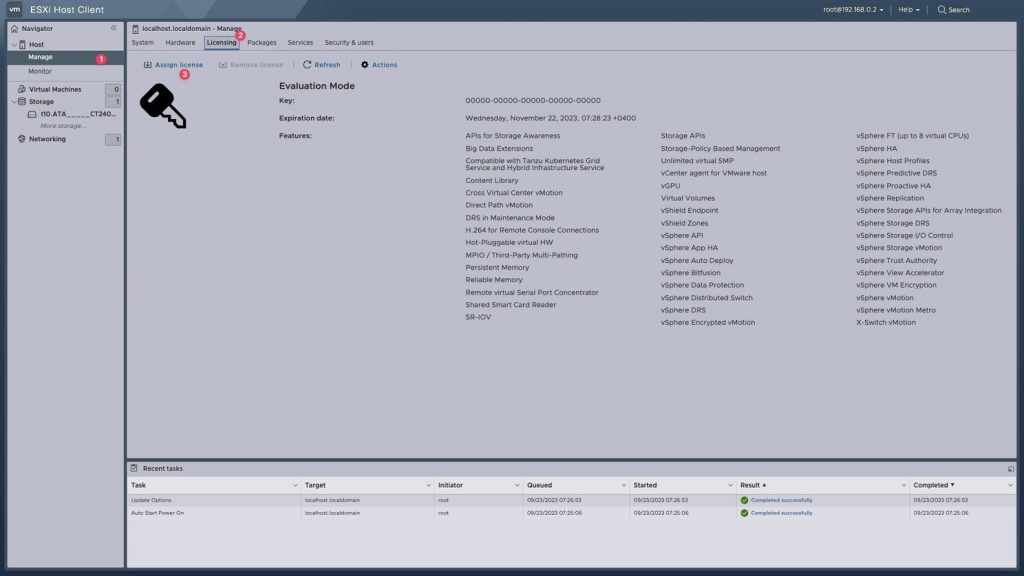
Once you have your license key:
1. Access your ESXi machine’s interface.
2. Navigate to “Manage” and then “Licensing.”
3. Select “Assign License.”
4. Paste your obtained license key into the provided field.
5. Click “Activate.”
Your ESXi installation should now be licensed and ready for use.
Adding Datastores to ESXi
Supported file systems on ESXi
The Virtual Machine File System (VMFS) is a specialized cluster file system developed by VMware, specifically tailored for the efficient storage of virtual machine files within the vSphere ecosystem. Its creation marked a significant advancement in storage virtualization, ensuring an optimized storage solution for virtual machines.
VMFS isn’t just a file system; it also acts as a volume manager, enabling the organization of VM files into logical units, known as VMFS datastores. This structure ensures an orderly storage system. In terms of storage backends, VMFS is versatile.
It’s compatible with SCSI-based storage, such as directly connected SCSI and SAS disks, as well as block storage via iSCSI, Fibre Channel, and Fibre Channel over Ethernet. However, it’s worth noting that while VMFS is pivotal in ESXi server environments, it doesn’t operate on systems that run VMware Workstation or VMware Player.
This exclusivity ensures that VMFS remains a cornerstone of VMware’s storage solutions, offering virtual machines a solid, efficient, and expandable storage base. There are many VMFS versions, we are going to use VMFS 6 in this setup.
To read more visit: https://docs.vmware.com/en/VMware-vSphere/7.0/com.vmware.vsphere.storage.doc/GUID-D5AB2BAD-C69A-4B8D-B468-25D86B8D39CE.html
Adding Datastores
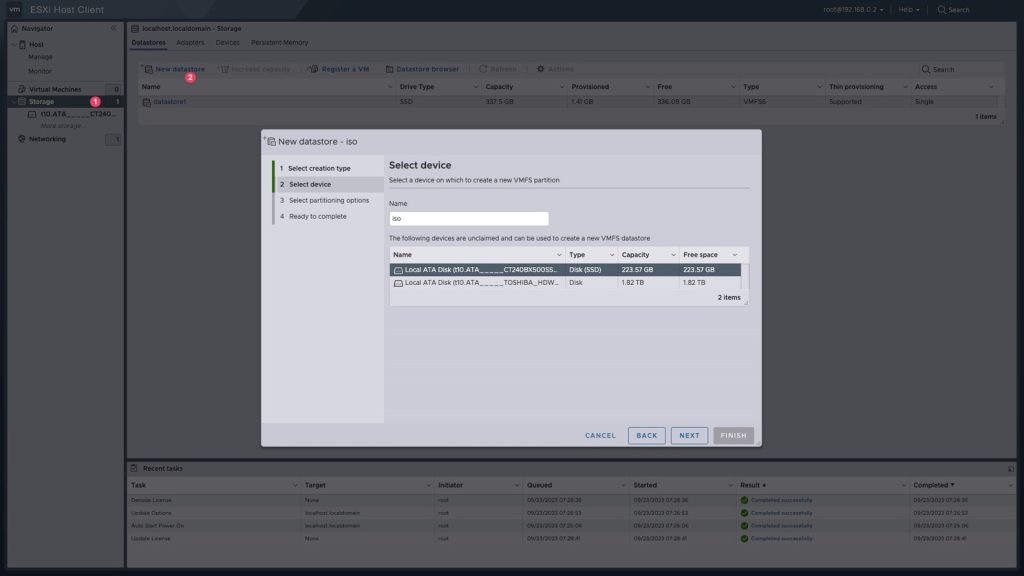
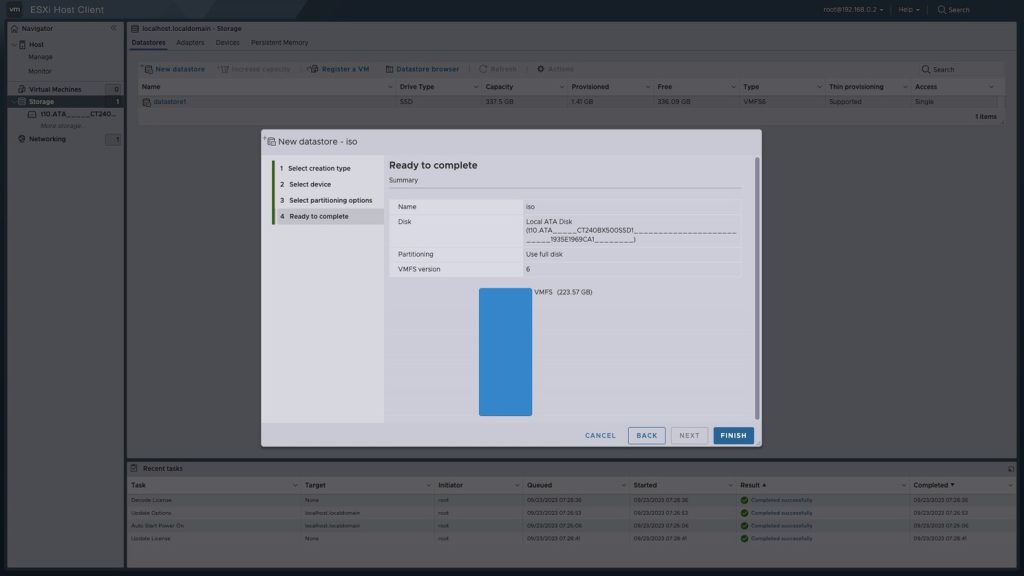
To create a new datastore in your ESXi environment:
1. Access the ESXi web interface.
2. Select “Storage” followed by “New datastore.”
3. Name your datastore appropriately.
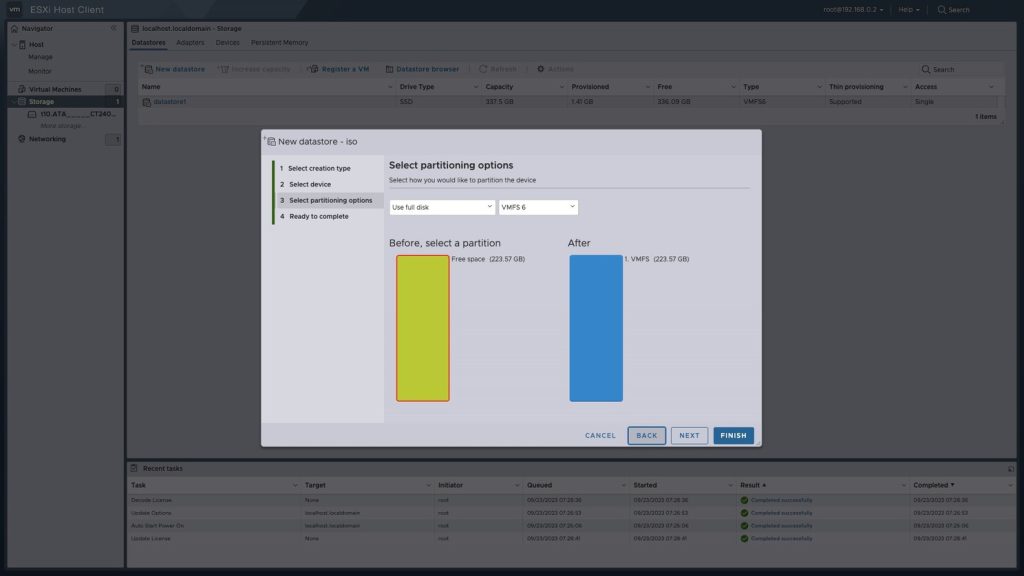
4. Choose the desired file system for your datastore.
5. Complete the process by clicking “Finish.”
These steps can be repeated for each of the hard drives you possess.
Enabling SSH to move files to the ESXi datastore
Enabling SSH
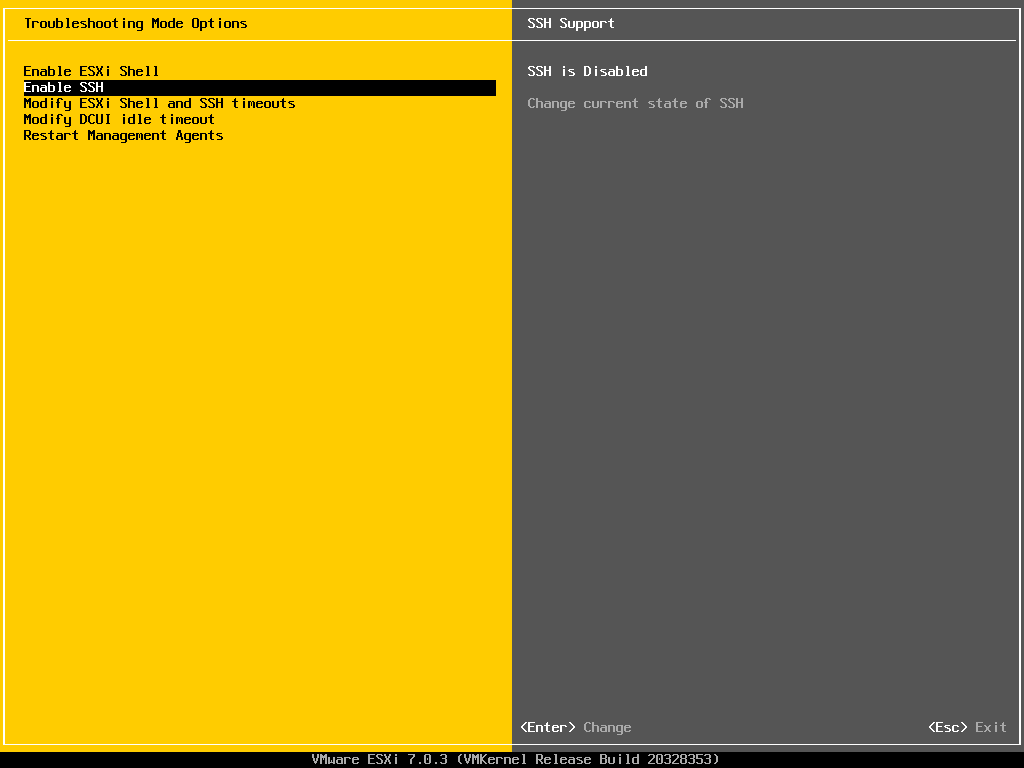
By default, SSH is disabled on ESXi to prevent any remote unauthorized access, To activate SSH via the Direct Console:
1. Login using the ‘root’ user credentials.
2. Navigate to “Troubleshooting Options.”
3. Choose “Enable SSH.”
4. Upon selection, the SSH service will commence.
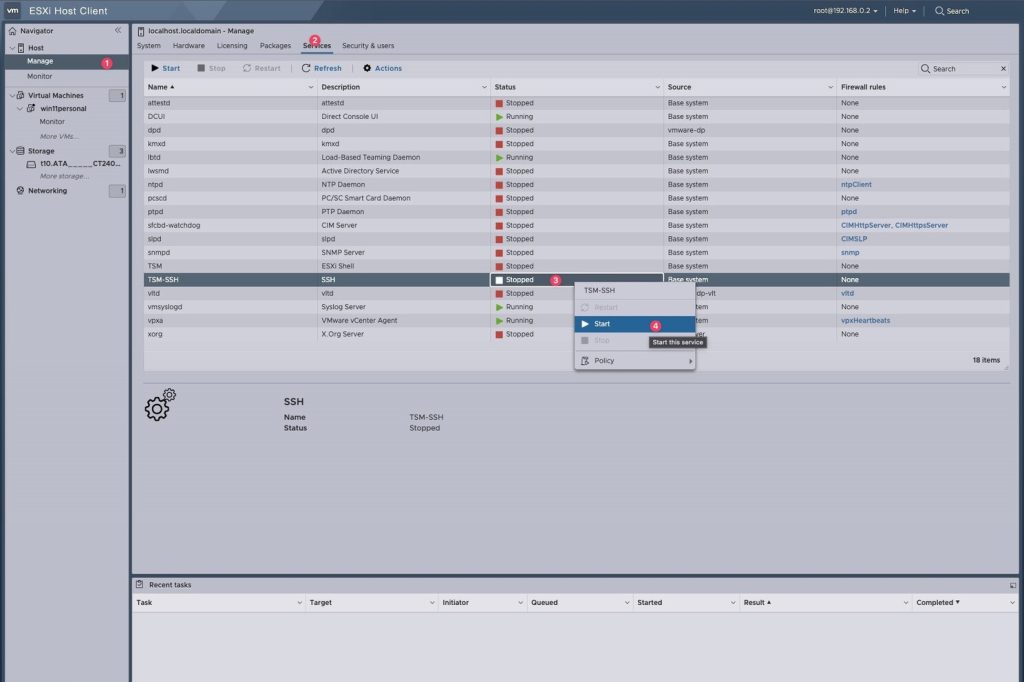
Or by using the web interface, to activate SSH on the VMware Host Client:
1. Navigate to “Navigator” and then choose “Manage.”
2. From there, select “TSM-SSH” in the services pane.
3. Click the “Start” button to initiate the SSH service.
4. If you want SSH to automatically start with your host, go to “Actions” and choose “Start and stop with host.”
Generating SSH Key-Pair Authentication
For enhanced security when enabling SSH service continuously, it’s advisable to set up a key pair authentication method. Additionally, for further protection, disabling password authentication is recommended. This ensures only those with the appropriate key can access the service, minimizing the risk of unauthorized access.
Generate SSH Key-Pair on the shell
# create key-pair
[root@ctrl:~] /usr/lib/vmware/openssh/bin/ssh-keygen
Generating public/private rsa key pair.
# set key-store location like follows (default on ESXi sshd_config)
# for other users ⇒ /etc/ssh/keys-(username)
Enter file in which to save the key (//.ssh/id_rsa): /etc/ssh/keys-root/id_rsa
Enter passphrase (empty for no passphrase):   # set passphrase (if set no passphrase, Enter with empty)
Enter same passphrase again:
Your identification has been saved in /etc/ssh/keys-root/id_rsa
Your public key has been saved in /etc/ssh/keys-root/id_rsa.pub
The key fingerprint is:
SHA256:uk+P14mmtLzAWjrEMpisknffKeuxjcKXuwWpufTqN1c root@ctrl.srv.world
The key's randomart image is:
.....
.....

[root@ctrl:~] ll /etc/ssh/keys-root
total 16
drwxr-xr-x    1 root     root           512 Feb 22 06:52 .
drwxr-xr-x    1 root     root           512 Feb 22 04:31 ..
-rw------T    1 root     root             0 Aug 23  2022 authorized_keys
-rw-------    1 root     root          2655 Feb 22 06:52 id_rsa
-rw-r--r--    1 root     root           573 Feb 22 06:52 id_rsa.pub

[root@ctrl:~] cat /etc/ssh/keys-root/id_rsa.pub >> /etc/ssh/keys-root/authorized_keys
# to disable password input authentication method too, set like follows
[root@ctrl:~] vi /etc/ssh/sshd_config
# line 32 :
# password authentication = no
# keyboard interactive authentication = no (add the line)
PasswordAuthentication no
KbdInteractiveAuthentication no
[root@ctrl:~] /etc/init.d/SSH restart
SSH login disabled
SSH login enabled
Transfer the secret key [/etc/ssh/keys-root/id_rsa] on ESXi Host to any client computer and verify SSH access with Key-Pair Authentication
# [id_rsa] file transfered from ESXi Host
[root@localhost ~]# ll ~/.ssh
total 12
-rw-------. 1 root root 2655 Sep 23 15:56 id_rsa
-rw-------. 1 root root  996 Sep 23 11:13 known_hosts

[root@localhost ~]# ssh root@ctrl.srv.world uname -a
Enter passphrase for key '/root/.ssh/id_rsa':
VMkernel ctrl.srv.world 7.0.3 #1 SMP Release build-20328353 Sep 27 2023 19:41:06 x86_64 x86_64 x86_64 ESXi
Copying Windows 11 iso file to ESXi using scp
To transfer the Windows 11 ISO file to your ESXi server, follow the outlined steps:
- Locate Your Destination Datastore: First, SSH into your ESXi server. Depending on the name you’ve given to your datastore, navigate to its location. In this example, the datastore is named “datastore3”:
# cd vmfs/volumes/datastore3/iso/After pressing [Enter], the path will automatically resolve to the UUID of the datastore, which might look something like this:
/vmfs/volumes/50902e8f-94294115-2675-00177c1136e1 #- Transfer the ISO File Using SCP:
On your local machine (from where you wish to transfer the ISO), use the scp command:
scp Win11_English_x64v1 root@192.168.0.2:/vnfs/volunes/datastore3/isoInstalling Windows 11
Creating a VM for Windows
Creating a virtual machine (VM) to install Windows 11 on ESXi 7 involves several steps:
1- Log in to the ESXi Host Client:
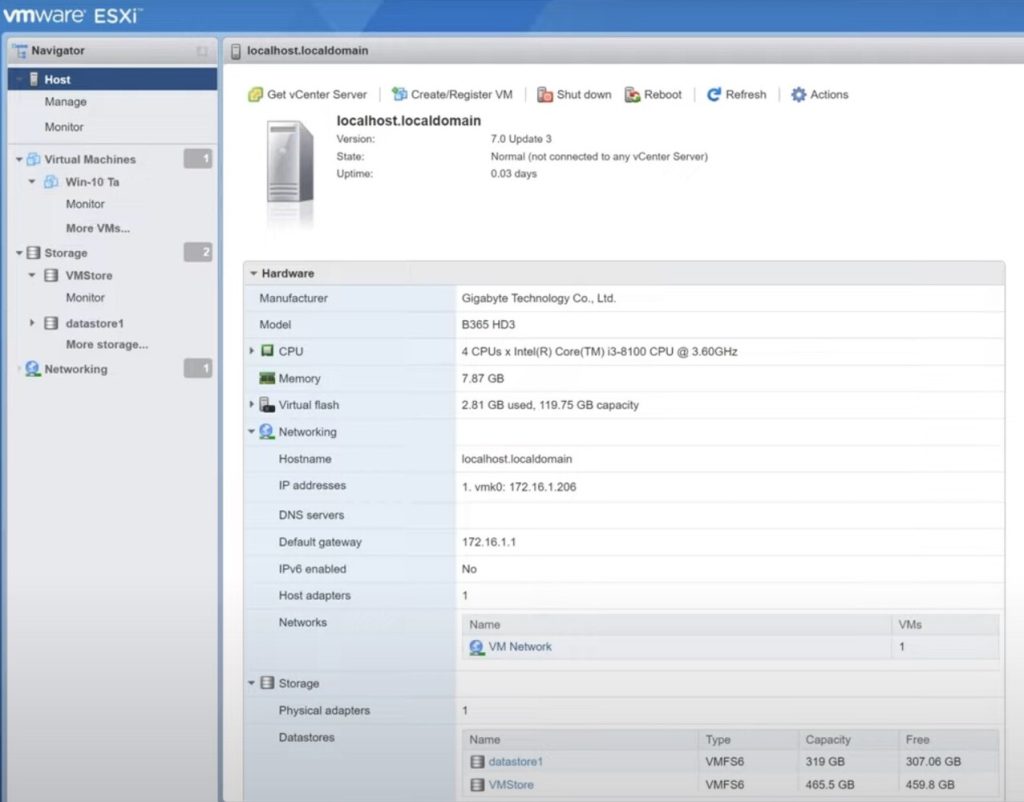
Open your web browser and enter the IP address of the ESXi server.Log in with your ESXi credentials.
2- Create a New Virtual Machine:
Click on “Virtual Machines” in the Navigator panel. Click on the “Create / Register VM” button. Choose “Create a new virtual machine” and click “Next.”
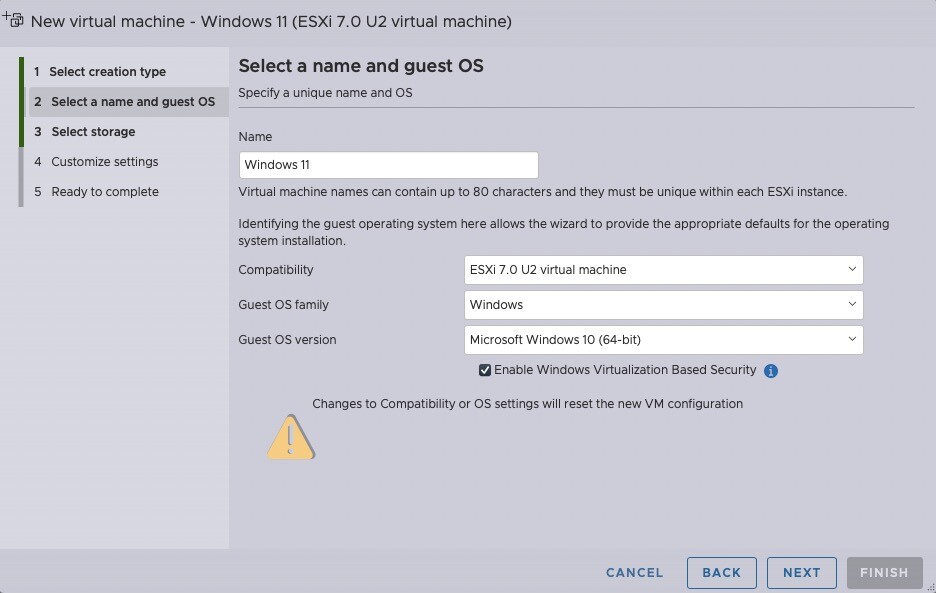
3- Virtual Machine Settings:
Name: Enter a name for the virtual machine, e.g., “Windows 11 VM.”Compatibility: Ensure it’s set to “ESXi 7.x” or later.Guest OS Family: Select “Windows.”Guest OS Version: Choose the version closest to “Windows 11” (if “Windows 11” isn’t available, “Windows 10” can generally be used). Click “Next.”
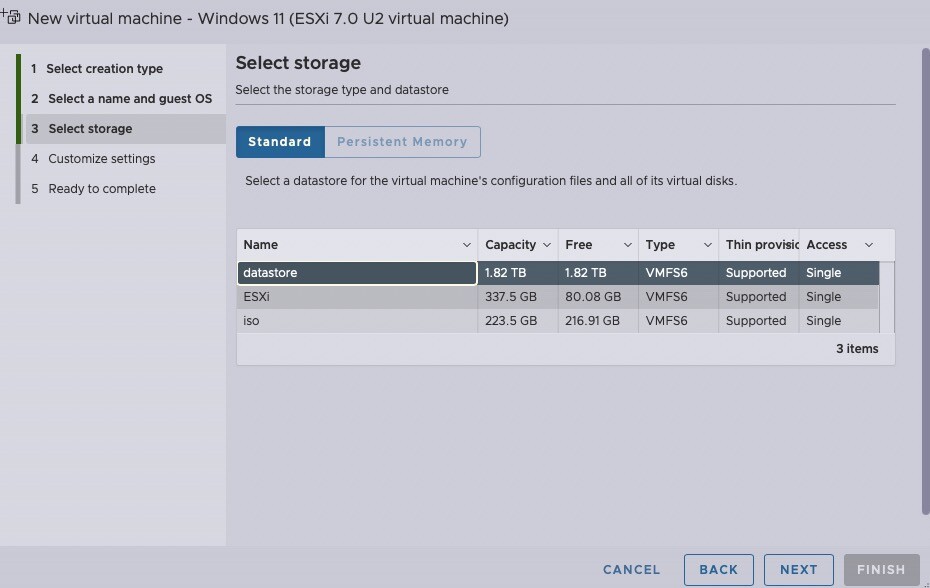
4- Select Storage:
Choose the datastore where you wish to store the VM files. This could be the datastore where you uploaded the Windows 11 ISO Click “Next.”
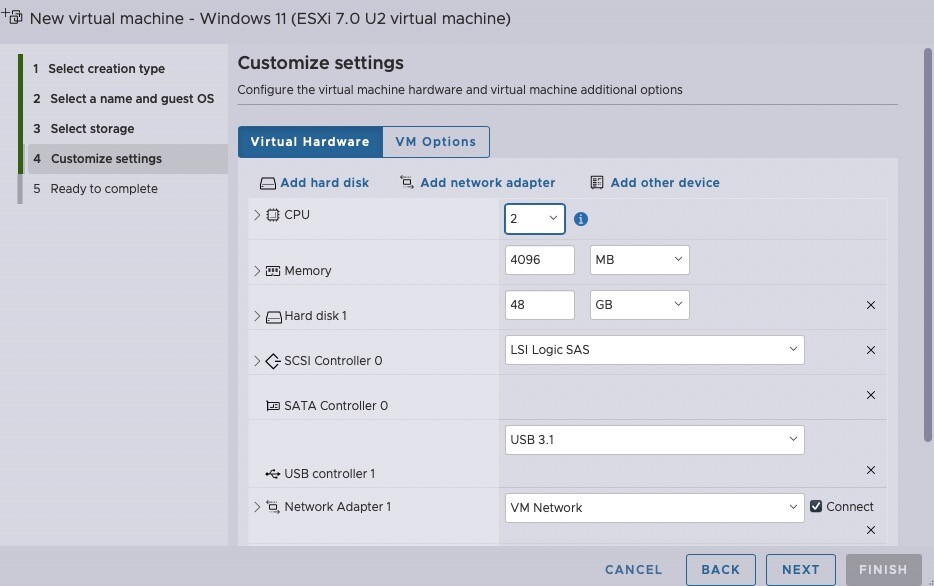
5- Customize Settings:
- CPU: Assign the desired number of CPU cores. Ensure you meet the minimum requirements for Windows 11.
- Memory: Assign the desired amount of RAM. It’s recommended to have at least 4GB for Windows 11, though more is generally better.
- Hard Disk: By default, a new disk will be created. Adjust the size as needed. Ensure it meets the minimum requirements for Windows 11.
- CD / DVD: Select “Datastore ISO file,” navigate to where you stored the Windows 11 ISO, and select it. Ensure “Connect At Power On” is checked.
- Network Adapter: Ensure it’s connected and set to the appropriate network or VLAN.
- Additional Devices and Settings: Configure other devices or settings as desired, such as adding USB controllers or setting boot options. Click “Next.”
- Review and Finish: Review the VM configuration to ensure everything is set up as desired. Click “Finish.”
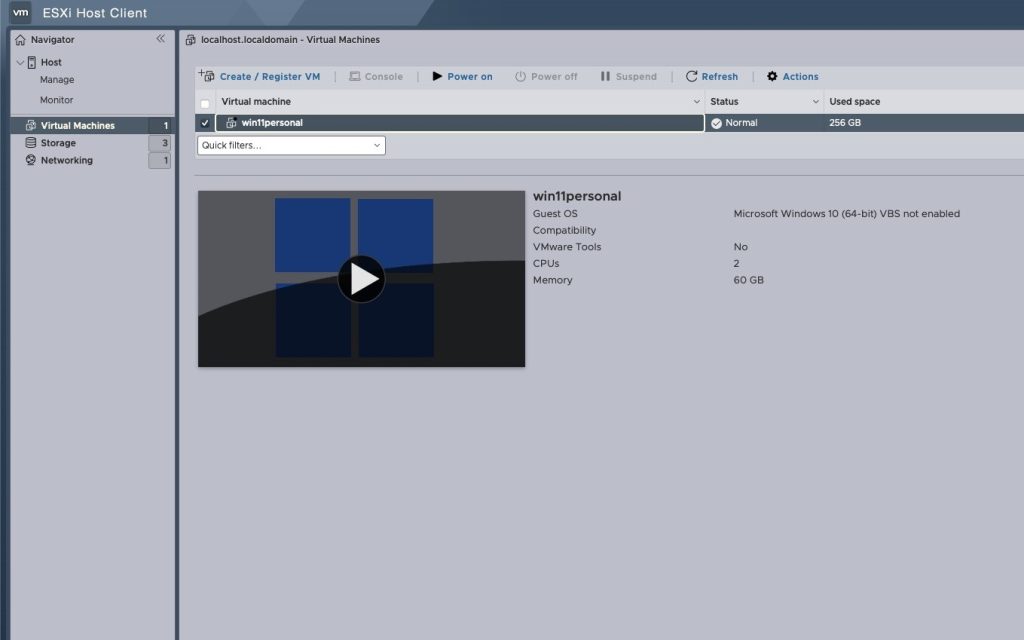
6- Power On the Virtual Machine:
Find your newly created VM in the list of virtual machines. Click on the virtual machine’s name to select it. Click on the “Power On” button (green triangle).
Install Windows 11:
Once the VM starts, it should boot from the Windows 11 ISO. Follow the on-screen prompts to install Windows 11. During the installation, you’ll be asked for the product key and other configurations. Complete the Windows setup.
Install VMware Tools (Post Windows Installation):
After Windows 11 is installed, go back to the ESXi Host Client. With the VM selected, click on “Guest OS” > “Install VMware Tools.” This will mount the VMware Tools ISO in the VM. Inside the VM, open File Explorer, navigate to the DVD drive and run the VMware Tools installer. Follow the prompts to install VMware Tools, which enhances the VM’s performance and functionality.
Bypass Windows 11 TPM security
Windows 11, Microsoft’s latest operating system introduced in 2021, has set stricter hardware prerequisites, notably the mandatory inclusion of the Trusted Platform Module (TPM) 2.0. This microcontroller enhances security by integrating cryptographic keys into devices, facilitating functionalities like Secure Boot, BitLocker encryption, and Windows Hello. While this move prioritizes heightened security against modern cyber threats, it has also led to concerns among users with older hardware that may lack TPM 2.0 compatibility. Before upgrading, users should ensure their devices meet these requirements.
Unfortunately, ESXi doesn’t accommodate TPM 2.0, so to install Windows 11, we’ll have to sidestep this limitation. While this workaround can be applied on physical hardware, it’s advisable to be cautious since these system requirements are set for specific reasons. However, in a virtualized environment, the isolation mitigates potential risks. In essence, our goal is to instruct the Windows 11 installer to disregard the TPM verification. As you proceed with the standard installation steps in your preferred virtual machine manager and embark on the Windows 11 setup, you’ll eventually encounter a message indicating your PC isn’t compatible with Windows 11. When you reach this screen, follow these steps:
1- Hit Shift + F10 on your keyboard to open Command Prompt.
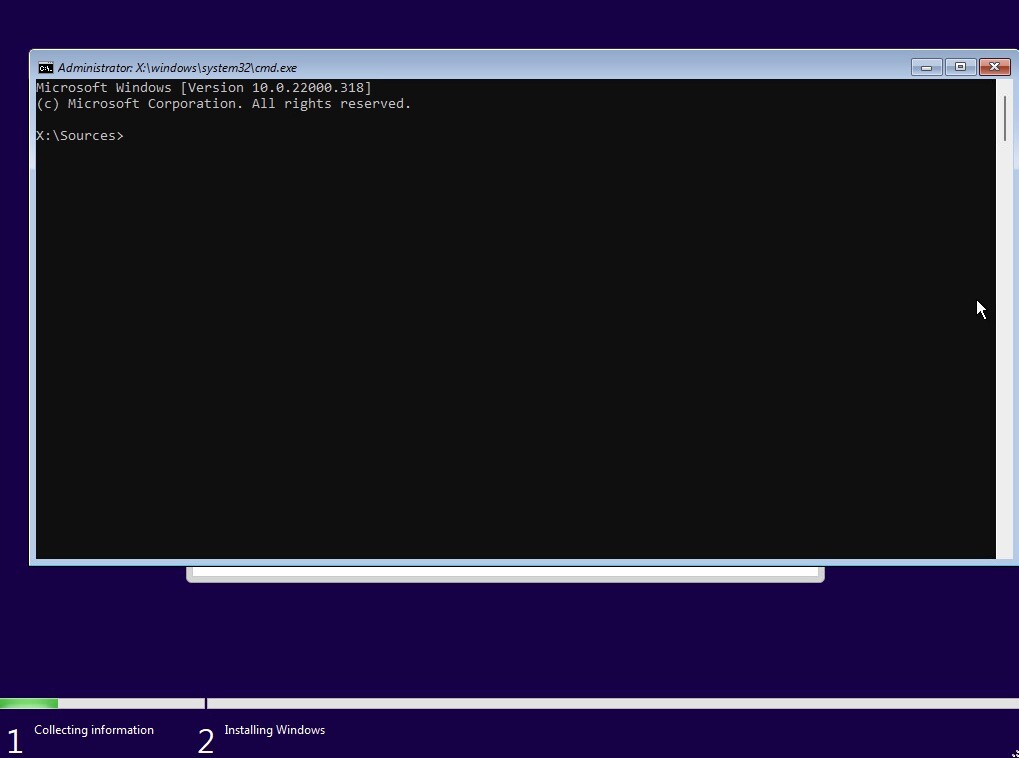
2- Enter the following command:
REG ADD HKLM\SYSTEM\Setup\LabConfig /v BypassTPMCheck /t REG_DWORD /d 13- When you see the operation completed message, close the Command Prompt.
Or, add it manually, first type the following command to open the Registry Editor
regeditand navigate to this directory:
HKEY_LOCAL_MACHINE\SYSTEM\Setup, create a new folder and name it "LabConfig" then create a new DWORD key and rename it to "BypassTPMCheck", changing its value to "1"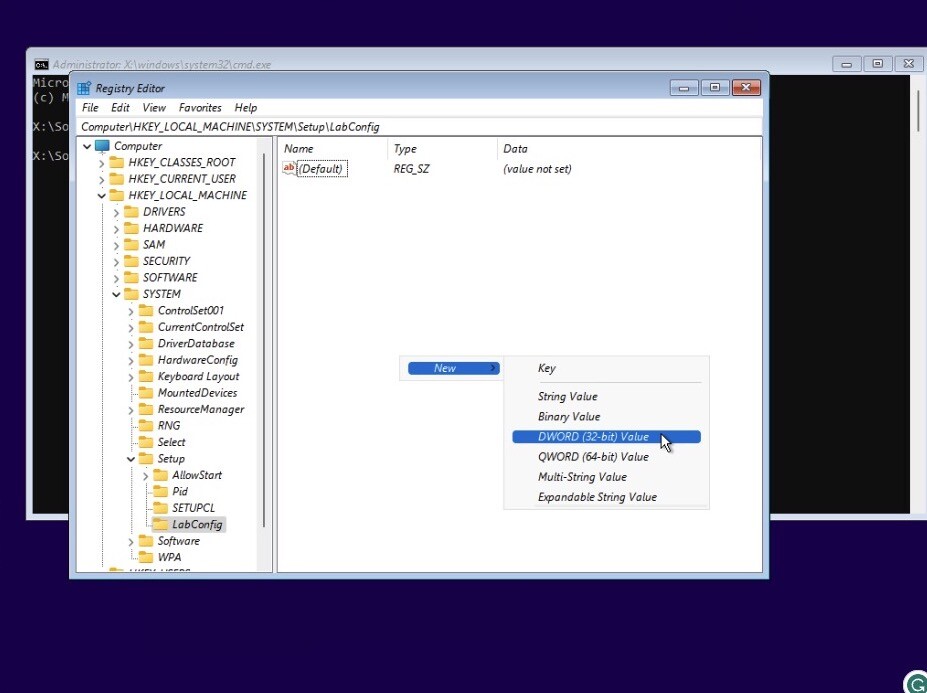
Congratulations, Proceed as normal.
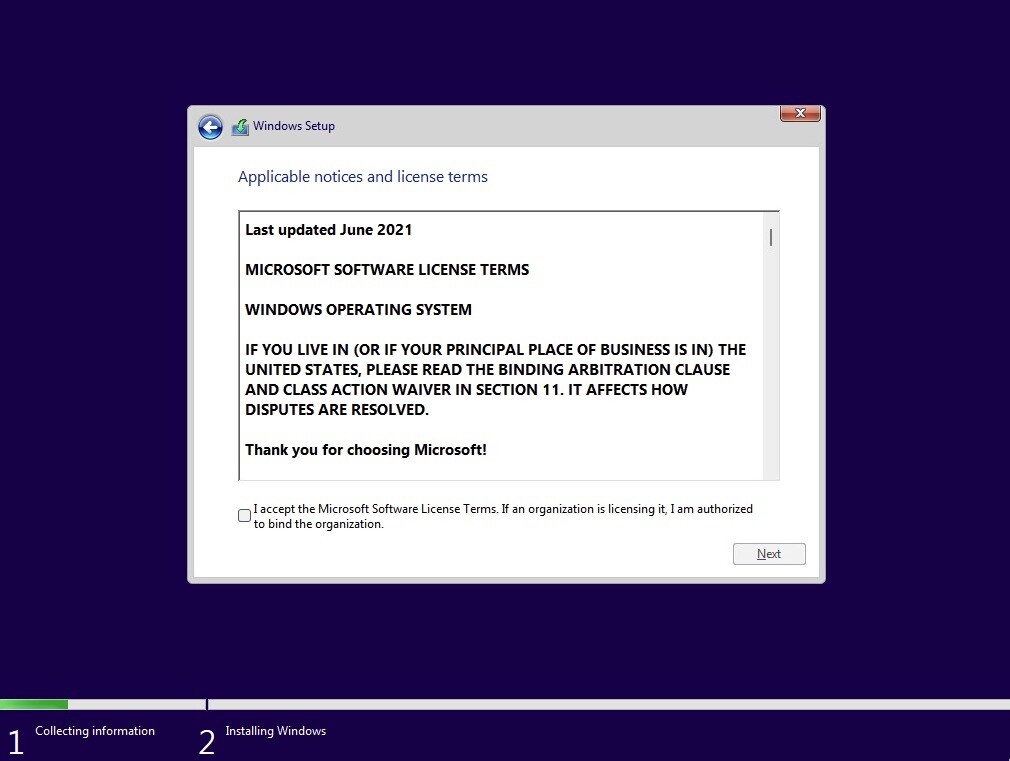
That’s all there is to it. Your Windows 11 VM will now install as normal with no warnings, and you can get onto some top-level virtualizing.
Resources:
- Server World https://www.server-world.info/en/
- Understanding VMFS Datastores https://docs.vmware.com/en/VMware-vSphere/7.0/com.vmware.vsphere.storage.doc/GUID-5EE84941-366D-4D37-8B7B-767D08928888.html#GUID-5EE84941-366D-4D37-8B7B-767D08928888
- Types of Datastores https://docs.vmware.com/en/VMware-vSphere/7.0/com.vmware.vsphere.storage.doc/GUID-D5AB2BAD-C69A-4B8D-B468-25D86B8D39CE.html
- ESXi Hardware Requirements https://docs.vmware.com/en/VMware-vSphere/7.0/com.vmware.esxi.install.doc/GUID-DEB8086A-306B-4239-BF76-E354679202FC.html
- What Is VMFS File System? A Complete Overview of Features https://www.nakivo.com/blog/all-you-need-to-know-about-vmware-vmfs/#:~:text=Virtual%20Machine%20File%20System%20(VMFS,virtual%20disks%20in%20VMware%20vSphere.

